
- Tap the SW1 button 5 times (top left button)
- On your smartphone or laptop, turn your Wifi connection off then back on.
- Connect to the BAT WIFI network name: IPD-CFG-AP-XX-XX-XX.
- Open a web browser. In the address bar type: 192.168.100.1
- Click “Scan for Wireless Networks”
- Select the customer’s wireless network name. If security credentials are required, you will be prompted to enter them.
- The message ‘Reconnection in Progress’ will appear when the Wi-Fi setup is successful.
Will Your Products Transmit Signals To My Central Station? YES
- Alula alarm communicators capture the signal from the panel and transmit to our network where they are then transmitted to your designated central monitoring station via IP or phone line.
- Alula provides a dual-path communication solution, giving you two separate transmission paths to your central station.
- Alarm signals are normally routed to your central station; however, signals such as open/close can be routed directly to the customer.
What is Loss of Remote Supervision (E356)
This is formally known as Loss of Central Polling
- A E356, or Loss of Remote Supervision, is generated from Alula servers.
- This is an indication that your device whether it is on Cellular, IP, or both Cellular and IP has lost a connection with Alula for longer than the Supervision Timer.
What Is Caller ID Phone Number
- Every signal that is sent to your central station will have this number masking where they are coming from.
- This is useful when troubleshooting lost signals or signals that have gone over to wrong accounts. Often a good trouble shooting technique is to call a Central Station and trace this number.
How To Transfer A Customer From One Dealer To Another
- Sign in to Alarmdealer.com using your Dealer username and password
- Click on ‘Dealer Menu’, select ‘User Accounts’
- Under the Username column, click on the account to be transferred
- Click on the ‘Transfer Account’ button, enter the required information
- Contact Tech Support at 888-88-Alula and request the transfer be approved
- Once transfer has been approved, receiving company must accept the account
Can An End-User Purchase Your Products And Sign Up For Your Service? No
- Alula solutions are only available to end users through licensed alarm dealers.
- Contact Sales at 888-88-Alula for dealers in your area
How To Select Service Plans
Service plans are selected on the Device Profile page
Alarm Transmission is selected for the communication of signals from the panel to ipDatatel servers, whether the account is monitored or not
Alarm Notifications is selected if the customer wishes to receive automated phone calls, push notifications, or emails for each type of specific signal
Interactive Services is selected if the customer wishes to use the ‘Securesmart’ application either for full interaction or with a key-switch set up
Panel Downloading is selected if the Alula device will be used to connect to a panel for uploading and downloading the panel programming
How To Transfer A Device From One Customer To Another
Transferring a device from one account (originating account) to another (receiving account):
Old Account:
- You will need to be logged in as a dealer to be able to manage your customer’s accounts. Select the customer’s account that the device is moving from.
- There will be a link to the right of the mac address labelled ‘Remove Device’
New Account:
- Now you will need to go into the account that you want to put this device on. In that account there is a tab labelled ‘Add hardware’.
- Once you click on the ‘Add Hardware’ tab, your ‘Registered Devices’ window will pop up.
- In that new window you will see a list of devices registered to your company. Search for the mac address and click on the associated serial number.
*Removing a cellular device from an account does deactivate the unit from Verizon after 24 hours.
How do I delete a device from a customer’s account?
How do I delete a device from a customer’s account?
In AlulaConnect, navigate to the “Customers” tab and select the desired customer.
Click on the “Account Devices” tap on the top of the screen. I list of all devices registered to this account will appear.
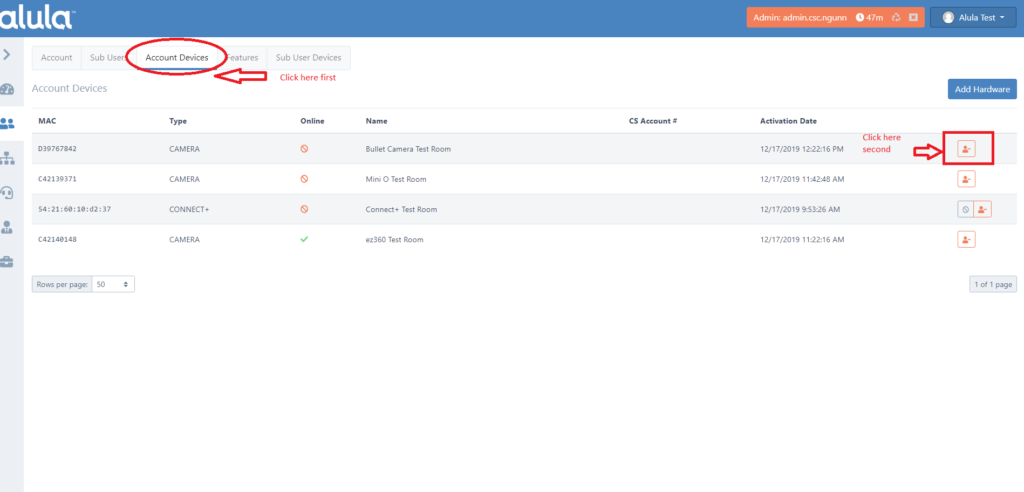
To delete a specific device, click on the red “unassign from user” button on the far right end of the desired device’s row.
This device is now deleted from the customer’s account.
How To Register Equipment
- Sign in to Alarmdealer.com using your Dealer username and password
- Click ‘Dealer Menu’ drop down, select ‘Hardware Registration’
- Enter 12-character mac address and crc number, click ‘Register Hardware’
- When registered, the ‘Successfully Registered MAC address‘ message will appear